One of the many interesting parts of this job is the detective work involved when a part isn’t welding properly. Roughly six months ago I was tasked with my first major metallurgical engineering project, which showed that the metal in your parts may have some hidden surprises.
This particular issue involved a customer part that we had been laser welding mostly problem-free in sizable quantities for several years. Our production officer had set up the job in accordance with our process documentation, but observed a crack running from root to surface of the weld when he cut his first piece sample.
We performed a few additional cross sections and found that the penetration and hardness were well within the customer’s requirements. This led us down the troubleshooting path of singling out each variable on our end, one at a time. However, we found nothing on our end that influenced this type of weld cracking. Our process had not fluctuated, our tooling was in tip top shape, and our machine output was well documented with no fluctuation in power or beam quality.
Difficult weld combinations
This led me down the road of metallurgical investigation. These parts happen to be comprised of two dissimilar alloys – 440C stainless steel and tungsten. By all rights, these alloys really should not be weldable for a number of reasons, primarily because tungsten is incredibly brittle – it lacks the ability to flex and stretch during the heating and cooling phases of a weld. This, coupled with the extreme melting point differences of the two alloys, creates an incredibly difficult-to-weld combination.
Therefore, we had to examine what made the weld possible in the first place and, by eliminating variables, figure out what had changed between the last several years of successful production and this particular order of parts. For that, we set off to gather as much information about the alloys as possible.
Piecing together a road map
We started with performing a coarse metallurgical analysis on the two components. Using our XRF gun (a portable, x-ray fluorescence device used to analyze the elemental composition of materials), we can see a breakdown of the heavy alloys in a customer’s part. The 440C showed all the elements we would expect to see in that alloy. The tungsten came up with large amounts of nickel and copper, with little else present. This correlated to the customer’s material certs, although it left us scratching our heads about how and why these elements would be alloyed with the tungsten. In comparing these alloying elements and the material certs, we were able to start piecing together a road map of what was going on.
The alloying elements had steadily decreased over the last several years according to the customer’s material certs. In addition, the yield strength gradually decreased while the tensile strength gradually increased, which effectively gives us a harder but more brittle alloy. We reached out to our partners at Mott Corporation to help us with a more in-depth look at what was happening to these parts.
SEM analysis
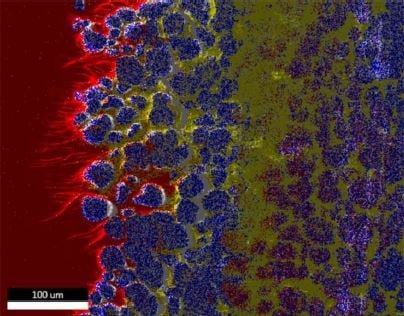
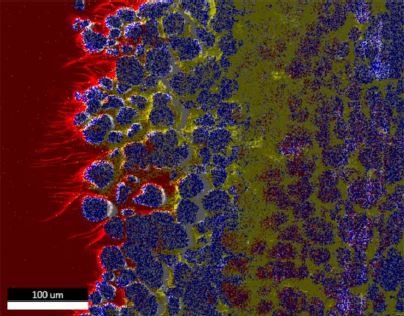
Mott brought us in to their metallurgy lab, which is equipped with an SEM (Scanning Electron Microscope capable of extreme magnification and elemental detection). The SEM analysis was able to show us the molecular structure of specific regions of the parent materials as well as the weld pool area. The images were stunning. The SEM effectively paints each alloying element in different colors so that we could see how the molecules were coalescing in our weld.


These photos show the laser melt weld pool on the left, a crack in the heat affected zone of the tungsten hardware, and the tungsten hardware at the right. The crack follows the intermetallic region (lower melting temperature phase containing W, Ni, and Cu) that encompasses the tungesten rich (high melting temperature phase).
We found that the tungsten was actually powder formed, with the nickel and copper being used as a sort of glue. In the region where the tungsten was not melted into the weld pool, the molecules appear as field stones with nickel and copper packed tightly between them. As we approached the weld region, the nickel and copper took on a liquid appearance like that of a river flowing around boulders of tungsten. We discovered that the nickel and copper were melting too soon, long before the tungsten did, which was allowing most of the “glue” to flow out of the powdered tungsten in the heat affected zone (HAZ) and into the weld pool. This left the tungsten nodules with too little glue to hold them together. Coupled with the increase in tensile strength, this gave us a metallurgical recipe for failure.
Utilizing this information, our customer was able to adjust the material requirements for their vendor and the product line was back up and running with the next shipment.
Questions about weld cracks? Talk to one of our experts, or leave a comment in the space below.

